Tampa Free Skool Garden

On Saturday September 1, 2012, we are going to hold the first workday and class for the Free Skool garden housed in our side yard. The goal is to have a space that is reminiscent of a community garden, but without the cost associated with the plot space. This will be something of a you sow, you reap adventure with people pooling kitchen scraps for compost, garden tools for a communal collection for use, labor skills for the starting and continuing of growth, and space that other people may not have available or the ability to utilize (some landlords care more about having sod).

Planning on using some of the starts from my new speedling trays to put into the free skool garden. A few people have expressed interest in basic gardening classes, which seem to make tons of sense to go with this project so people without a great deal of experience in the dirt can also be involved, though I feel wholly unqualified to teach such things since I really just throw dirt and seeds around and hope something happens. Every book I read about gardening or botany just makes me more aware of how much I don’t know, and I mean, really I’ve only been doing this gardening bit for 2 years now.

Apparently throwing dirt and seeds around haphazardly does a lot.

On Hoping We Don’t Burn the House Down

We were gifted an amazing electric pottery wheel a while back by some friends in the area. As with most things in my life, I didn’t hesitate to jump in with both feet, make a fairly substantial investment in tools and supplies for the craft, and then, as with most crafts and hobbies I take on, I realized it was not as easy as I would have liked, or that someone else in the house doing it is much better at it than me (*ahem* my husband) and then I slow down on learning or trying so as not to be shown up or have to put in sooo much effort.

Thankfully, even though I am not excellent on the wheel – centering is a beast and I have a great deal of respect for anyone who can fashion even the most elementary of pots on a wheel now – I picked up a bazillion slip molds from a gentleman who listed a thousand or so on Freecycle. While making slip is a bit difficult since it needs to be a smooth slip rather than having chunks and I did not purchase slip, but instead purchased clay that I used scrap pieces of to make slip, I found I’m a bit more adept and creating molded pieces that stay together and by nature, are the appropriate shapes (round rather than wavy and oblong) that I want them.

An awesome new friend that I met through a Tampa Free Skool class on soap making that she taught mentioned in passing that she had a small kiln. I assumed it was set up at her house and asked if I might be able to make use of it, but it turns out that it doesn’t require a utility plug, and is small enough that we could actually bring it to our house (as it was not set up at her house, but in storage).

There are no instructions with the kiln, that is originally intended for glass work and fiber (it’s technically a fiber furnace, though what kind of fiber goes in kilns, I have no idea), but it dials up to 8 and then HIGH and I did a little bit of research on the ramp heat for a bisque firing (the rate at which temperature is supposed to increase while you fire a piece). Despite having the kiln in the car port and far enough away that were something to go badly awry and explode, I was still pretty nervous as the temperature topped 500 Fahrenheit that the whole thing would just burst into flames and take our house down with it. Nevertheless, that did not happen, and we ended up with some clinky bisque fired pieces when the 12 hour period passed and the morning came with the kiln having cooled down entirely (which I thought wouldn’t happen and would be entirely too fast for the pottery, but they seem sound).

The two pieces on the left were done by my husband and the one on the right is the first bowl I managed to make on the wheel.

Constructing Our Living Gazebo

While the Florida sun is great during the summer for certain crops (or so I’ve heard – we’ve yet to grow much during that part of the year) like watermelon, peppers, etc. it doesn’t fare so well for greens, which appreciate a much cooler clime than we have here in Tampa. Nate is obsessed with Swiss Chard and I would like to keep fresh salad around longer than the summer might allow, so we decided to utilize the shade under the tree in the side yard to create a plant-gazebo from a pentagon shaped raised bed.

Someone was throwing away probably 40 bags of these water-reed cuttings. The yard smelled a bit fishy initially, but the smell went away and it is nice to know that these plants are highly unlikely to seed or grow through the compost since they are obviously water dwellers.

After I raked out the reeds I lay down boxes within the frame to suppress the grass weeds growing underneath and to help create a barrier that will make heat and faster decomp for the weeds and the reeds.

It took all the compost we had left in our pile (some of it not entirely broken down) to fill the pentagon. We laid own boxes over most of the rest of the side yard and covered that in reeds as well, to suppress grass and provide some organics to cover the boxes and break down slowly over the mostly sandy ground.

Our raised beds are not nearly as deep as what most people recommend for raised beds, but for us they have primarily served as partitions so that we know where we are planting our food. Since we have rabbit poo and duck poo aplenty (6 growing ducklings makes for a lot of duck fertilizer!) and we collect compost on a regular basis in addition to what we actually generate, supplementing our growth with organic material on a regular basis should never really be an issue. I have gotten the impression that the deep raised beds are to keep out very hearty weeds (which we have so few of since so much of the yard is straight sand and the few weeks which are there grow fairly low) and to make the bed easier to work without bending over, which we don’t mind doing since we’re still young and spritely and under the age of 30 for a few more years yet!

The plan is to string rope or twine along the top of the bars at each point of the pentagon and plant beans, climbing nasturtiums, and cucumbers (if they’ll hold up climbing that) to create a sort of living gazebo wall around the tree to provide extra shade for the greens that will be growing underneath. I placed large slate tiles in the middle of each section and we already have a few sprouts, my favorite of which are the hot pink chard – which is a color I never though occurred in nature prior to seeing these sprouts. Anybody know if these are natural or if they were engineered to be those colors?!

Bring me my mead, wench!

  I browsed through this book by Sandor Ellix Kaltz about using wild yeasts to ferment everything from fruit to bread to…lots of other things. The very simple recipe for T’ej (Ethiopian style mead) in the book was the basis for my first fermentation experiment. Nate and I tasted the fizzy drink yesterday and decided that it’s definitely not done, definitely doesn’t have hardly any alcohol in it, but tastes like honey soda and something happened since it was funneled into Cole B.’s graciously loaned out carboy.

Since we love mead and have been really loving the South Tampa farm, we obtained a few carboys from the local Southern Brewing supply store and a mead, cider, and sake yeast (the wild yeast worked, but we were impatient and decided to go with a corporatized yeast strand) from Wyeast.
In the 3 gallon batch we used the following:
1 large sweet lemon (a Bird Box good)
3-4 cups of Kaleisia‘s Raindrop Green Tea (our favorite of their teas)
12 cups of raw, unheated, unfiltered honey from the South Tampa Farm
22 cups of warm water
1/2 packet of yeast (it was enough to make 6 gallons)

L to R: Large batch, plain mead, cider, wild mead

We food processed the lemon, rinds and all, and mixed it with the freshly brewed tea into the bottom of a clean 5 gallon bucket (sanitized beforehand and made of food grade plastic). We measured out the honey – I insisted on measuring rather than eyeballing and we just made a pot of tea for us to drink after to get the remaining honey out of the measuring cup – and Nate whisked it all together while I poured the honey in so the honey would dissolve evenly. The yeast is supposed to either be activated and let sit for 3 hours so you can watch the packet swell to prove it’s good yeast, or come to room temperature – we are dumb and activated it, but only waited about an hour. All that did was make for slight paranoia from Nate about whether it would work since it didn’t start to bubble right after we put the yeast in. We waited about an hour so the mix could cool, strained/funneled it into the carboy and then poured the yeast in.

The other half of the yeast packet went toward a 1 gallon carboy of cider, and a plain 1 gallon carboy of mead (just 4 cups of honey and warm water). Nate wanted to put yeast into the T’ej bottle, but since it started as a wild yeast experiment, I decided we should keep it that way.

And for your reading pleasure, a recipe of mead (meathe in Old English) from the 17th century book From the Closet of Sir Kenelm Digby Knight Opened. Sir Digby’s recipe is a fun read, and maybe one that would be worth trying in the future.

A copy of the book this excerpt is from can be downloaded here: gutenberg.org
Just look up digby as an author.

To Make Excellent Meathe

To every quart of Honey, take four quarts of water. Put your water in a clean Kettle over the fire, and with a stick take the just measure, how high the water cometh, making a notch, where the superficies toucheth the stick. As soon as the water is warm, put in your Honey, and let it boil, skimming it always, till it be very clean; Then put to every Gallon of water, one pound of the best Blew-raisins of the Sun, first clean picked from the stalks, and clean washed. Let them remain in the boiling Liquor, till they be thoroughly swollen and soft; Then take them out, and put them into a Hair-bag, and strain all the juice and pulp and substance form them into an Apothecaries Press; which put back into your liquor, and let it boil, till it be consumed just to the notch you took at first, for the measure of your water alone. Then let your Liquor run through a Hair-strainer into an empty Wooden-fat, which must stand wnedwise, with the head of the upper-end out; and there let it remain till the next day, that the liquor be quite cold. Then Tun it up into a good Barrel, not filled quite full, but within three or four fingers breadth; (where Sack hath been, is the best) and let the bung remain open for six weeks with a double bolter-cloth lying upon it, to keep out any foulness from falling in. Then stop it up close, and drink not of it till after nine months.

This Meathe is singularly good for a Consumption, Stone, Gravel, Weak-sight, and many more things. A Chief Burgomaster of Antwerpe, used for many years to drink no other drink but this; at Meals and all times, even for pledging of healths. And though He were an old man, he was of an extraordinary vigor every way, and had every year a Child, had always a great appetite, and good digestion; and yet was not fat.”

I wonder if by Blew-raisins he actually means raisins or if he means grapes or blueberries. Anybody familiar with the usage in the 17th century of that phrase?

The Beekeeper’s Lament

I’m reading the book by Hannah Nordhaus, which is something of a biography of a not-so-famous beekeeper who just happens to be one of the largest (not him, his business) in the industry, with tens of thousands of hives.

Despite the fact that honeybees are called European bees, it took me longer than it should have to figure out that they weren’t at all native to the U.S., but were brought over with all of the non-native crops. As much as I’m for native foliage and native food and taking out invasive species, there are a large number of plants and crops that I have a hard time thinking of as invasive when they aren’t monocultured on a massive scale.

Beekeeping is fascinating in and of itself, but especially with how it relates to the things we grow and the fact that John Miller, the beekeeper of interest in the book relates it to a constant exposure to death (thousands of bees die daily under his care) and a large scale small creature mortician.

The second Thursday of each month the Tampa Bay Beekeeper’s Association meets and I’m planning to go to their meeting in hopes that I might found out more information and if this is a pursuit worth chasing after, if not for the honey, for the sake of our ever-growing garden. I have a long history of being attacked by things that sting, not the least of which was the most traumatic event at age 5 or so by a nest of ground bees in Germany which was a mass of welts all over (though for future reference, raw onion placed on stings cuts the burn a bit – tip learned from the elderly Germany ladies who patched me up way back when). I also need to figure out if a poll from out neighbors might be necessary or if this is something doable with minimal disturbances to the neighbors…and I guess their pets, too (though most of the dogs in the neighborhood are more than obnoxious and could do for a few stings on the nose to show them they aren’t all big and bad and in charge of the place)…

I’ll keep you posted, as I hope to not only go to the meeting, but accompany some of the keepers to the apiary this Saturday to watch/help them work.

One clover, and a bee,
And revery.
The revery alone will do,
If bees are few.

-Emily Dickinson

Homemade Laundry Detergent

Keep in mind this is not a detergent safe for using as direct irrigation on plants from a greywater system as it contains borax. It is, however, wicked cheap. If it has funky results over the long run, I’ll let you know.

Ingredients:
1 bar of Fels Naptha
1 box of Borax (20 Mule Team)
1 box baking soda

You won’t use all of these, but they are the quantities you buy in and they will make you several batches of detergent.

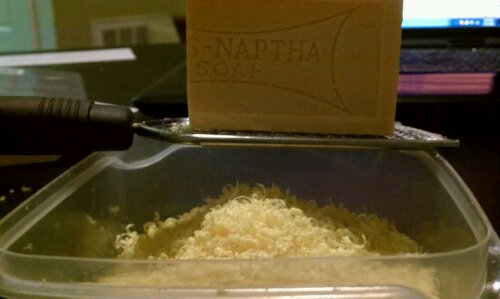
Grating soap, regardless of how much it looks like cheese, is much harder than grating cheese.

But, grate 1/3 of that sucker.

image

Add 6 or so cups of water in a pan and heat it up until the soap gets all melty.

image

Add 1/2 cup of baking soda and 1/2 cup of borax. Stir until everything dissolves.

Take off stove. Put ~4 cups of hot water into the bucket you’ll store the soap in (bucket needs to be at least 2 gallons large for this adapted recipe)

Pour in soap mix and stir. Add 22 cups of water and stir.

Let it sit for ~24 hours and it will turn into a somewhat liquidy gel. 1/2 cup per load will do the job.

I exchanged 2 cups of water for vinegar since that acts a a whitener. If it ruins the detergent since it reacted partially with the baking soda, I’ll let you know, but it hardly fizzed at all wheni first put it in the bucket.

48 Hour Carpentry

image

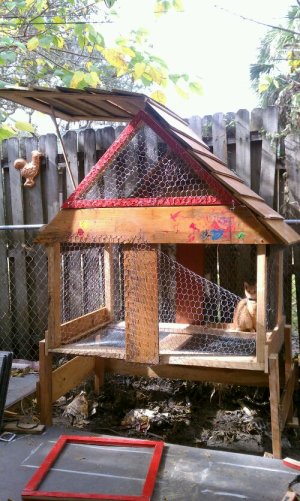
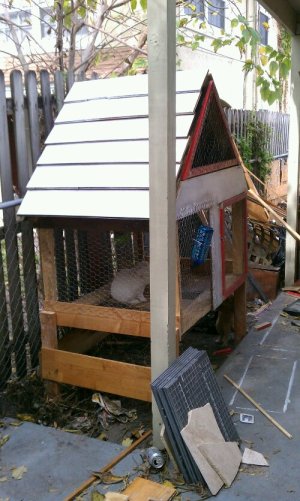
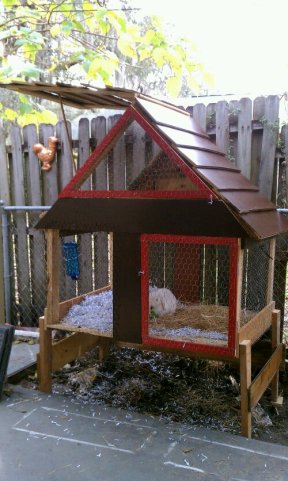
Within a matter of 48 hours ago, I decided to acquire the free bunny offered up by a woman on Freecycle and then I had a deadline to build a hutch to house the creature. The woman had offered a male and female pair, but gave the male away to a school, so instead we got Rosemary, the lady. I named her that because I’m sure the first bunny Nate makes will be covered in Rosemary and they will only have food names since they are intended for food. I think I shall call the boy Tarragon.

image


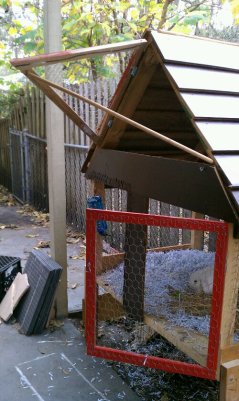
The majority of the materials in assembling this hutch were either items from Freecycle, Craigslist’s free section, or dumpster dive-acquired. I did purchase the hinges, the chicken wire, and the paint (which was originally acquired for the duck coop). The A-frame was made with pallet wood (thanks for disassembling that, Jay!) and then shingled with old laminate floor boards that someone gave away on Craigslist a while back.

I opted for the A-frame because of rain run off and because I like the idea of it looking decorate and being tall. It also seemed like the most viable way to make something so there would be more ventilation come summer time when it gets very hot.

Our neighbor let us borrow his awesome circular saw that has a laser sighting on it, which I’m sure contributed greatly to some of these angled cuts that were completely eyeballed by me. I’m glad I didn’t use our mitre saw for the larger pieces of wood (the top part of the T shape), because the mitre saw was a complete pain to adjust when I did the top door with the 1x1s).

image

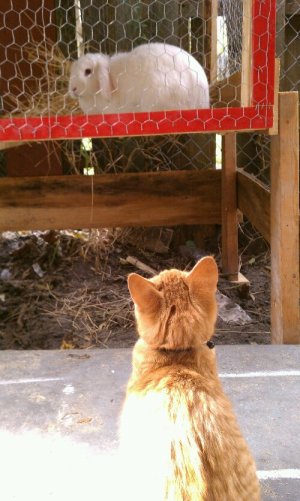
Bunneh says, "Pleez Jeezus save me from teh kitteh"

image

So far the rabbit absolutely loves the buckwheat we have growing in the less fertile areas of our lawn. This was originally intended as a cover crop for those poor nutrient areas, but they are quickly becoming bunny feed to supplement hay, lettuce and other such things. We have seeds for alfalfa and best get started growing that quickly since she may eat us out of buckwheat and Nate’s take home lettuce scraps pretty quickly.

I have learned that rabbits have a very quick gestation period. The people that gave us the rabbit bred us for her the day they gave her to us since they had already promised the male to someone else. They said she should give birth in 28-30 days. Then we have little walking braises, stews, and soups walking around for the next 2 months or so until they are ready for cooking up. If it turns out that she isn’t pregnant (which sounded unlikely), we will get a buck to house with her and breed with her. If she is pregnant, we’ll wait until those babies are bigger/eaten (whichever comes first?) until we introduce a buck so that he doesn’t eat the wee ones.

Would it be too terrible to post pictures of the first slaughter? This is all a learning process for us and something of an educational experiment, so it seems appropriate to me, but maybe there should just be some fair warning for those who have a weaker stomach or only like fluffy things when they are alive and kicking rather than headed toward a cast iron skillet.

Also, you should listen to this playlist made by Sarah C. in honor of Rosemary, all about Rabbits… Rabbit Mix Pretty awesome stuff.


image


image


Tampa Free Skool

I’m a fan of the free skool idea, and not just because I helped with the startup of the one in Tampa. It’s free, open, community education. No, it’s not accredited, but it’s valid, fun, and anyone can join a class or teach a class, no matter how much money is in your bank account.

I forgot this Friday that I had volunteered our carport space for a “Bucket Drum” class. I came home to a handful of folks holding a drum circle in our carport. It was kind of an awesome thing to come home to. A good use of our space.

If you’d like to teach a class or just find out more about the free skool, visit the website at TampaFreeSkool.com